Download Litematica – a powerful and popular Minecraft mod designed to assist players in building complex structures with greater efficiency and precision. Developed as a successor to the Schematica mod, Litematica offers an array of advanced features that make it an essential tool for both casual and expert builders.
Litematica mod offers advanced schematic tools for importing, exporting, and editing structures with precision. Ideal for both builders and redstone enthusiasts, Litematica enhances creativity and efficiency in Minecraft construction. Download now for the ultimate building experience.
Litematica is a Minecraft mod that allows players to import 3D blueprints to help with building. It has many extra features, including: Schematic pasting, Area cloning, Moving, Filling, Deletion.
Introduction
Welcome to the world of Litematica – your go-to schematic mod revolutionizing the Minecraft experience! Crafted from the ground up, Litematica is designed to seamlessly integrate with light mod loaders such as LiteLoader on 1.12.x, Rift on 1.13.x, and Fabric on 1.14+. But that’s not all – a Forge version for 1.12.2 is also available, with plans for Forge ports on 1.14.4+ in the pipeline. What sets Litematica apart? Picture all the beloved features of the classic Schematica mod, and then imagine a host of additional functionalities that take your gameplay to new heights. Litematica encompasses everything you loved about Schematica, minus the printer feature (but fear not, as this capability is open for extension mods to handle).
Our commitment to innovation doesn’t stop there – Litematica is a testament to the evolving landscape of Minecraft mods, providing a cutting-edge experience tailored to the latest versions of the game. The mod’s adaptability ensures that you stay ahead of the curve, enjoying all the benefits and enhancements as Minecraft continues to evolve. Whether you’re a seasoned Minecraft enthusiast or a newcomer eager to explore the limitless possibilities, Litematica invites you to discover a world where creativity knows no bounds. Join us on this journey, where every block becomes a canvas, and your imagination is the only limit.
Explore the features, dive into the details, and witness firsthand how Litematica transforms your Minecraft adventure. The future of schematic mods is here – welcome to the next level with Litematica!
Key Features
Unlock Limitless Creativity with Litematica’s Unique Features:
- Holographic Blueprints:
Witness your creations come to life with Litematica’s signature holographic display, providing a precise, in-game guide on structure placement. Build with confidence as you follow the hologram’s cues, ensuring accuracy and efficiency in every block placement.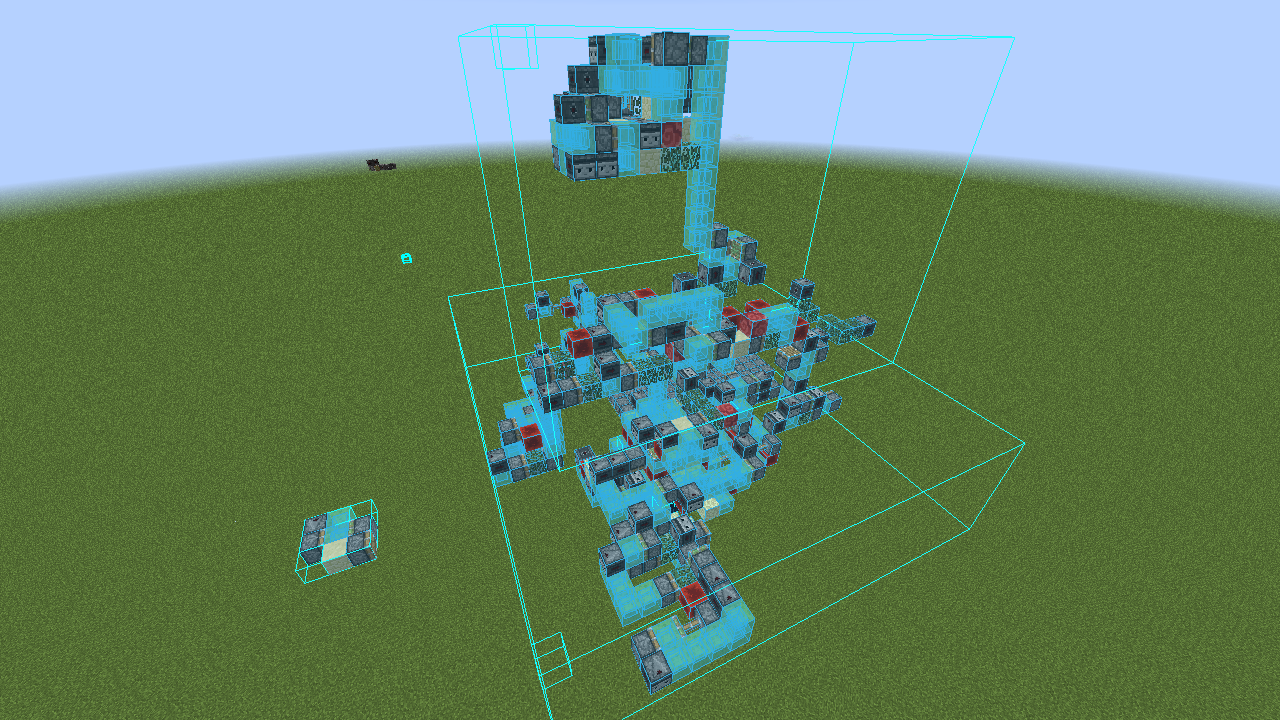
- Configurable Overlay:
Tailor your experience with a configurable overlay that highlights missing, extra, or incorrectly placed blocks. Litematica puts you in control, allowing you to customize the display to match your preferred building style and preferences.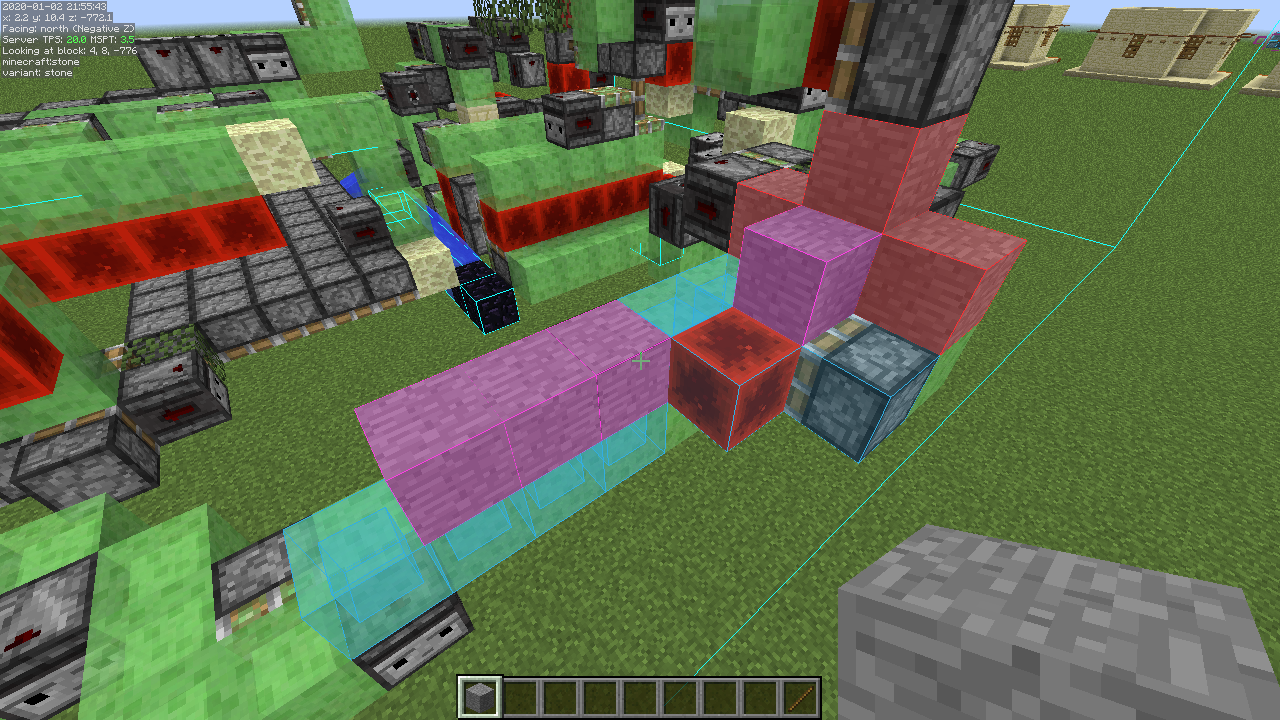
- Material List Mastery:
Stay organized and gather resources effortlessly with Litematica’s Material List feature.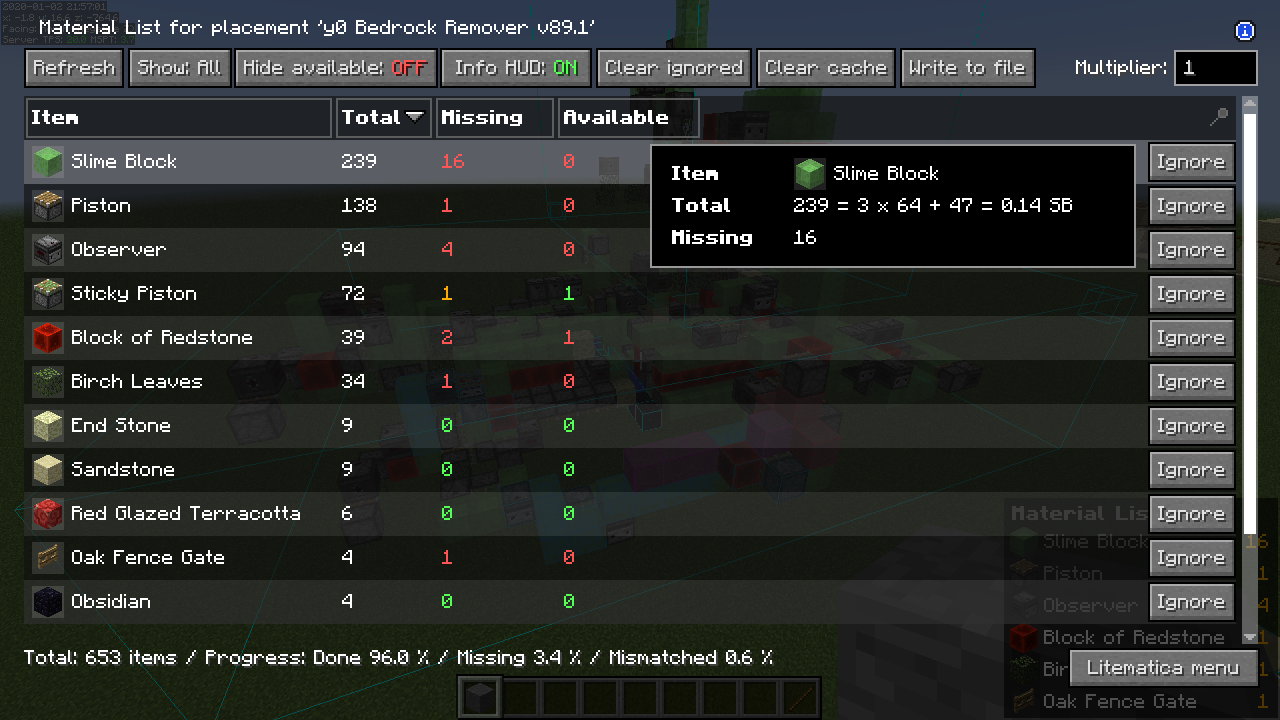
The intuitive Material List HUD keeps track of all required materials for your build, turning resource collection into a streamlined process.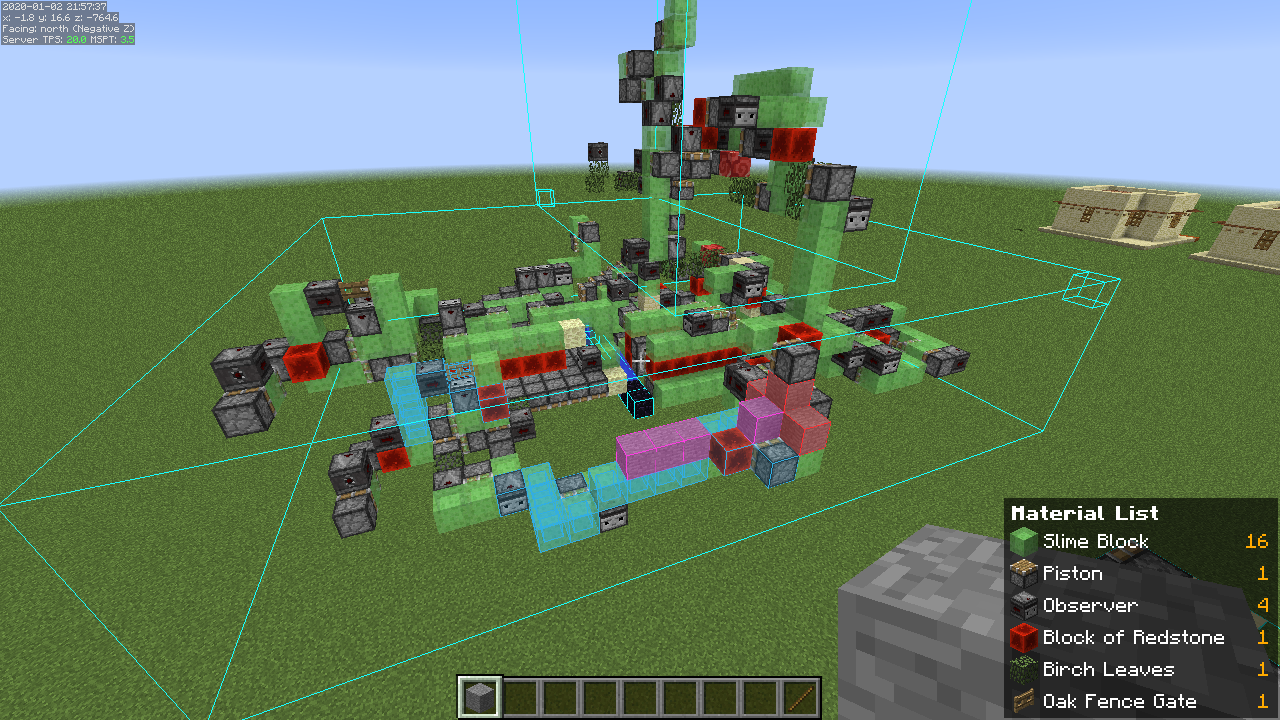
- Schematic Verifier:
Elevate your building precision with the Schematic Verifier. Scan your entire schematic area and identify any potential errors or discrepancies. Perfect for technical and redstone builds, this feature ensures a flawless execution, sparing you from the headaches of tiny mistakes that could disrupt your masterpiece.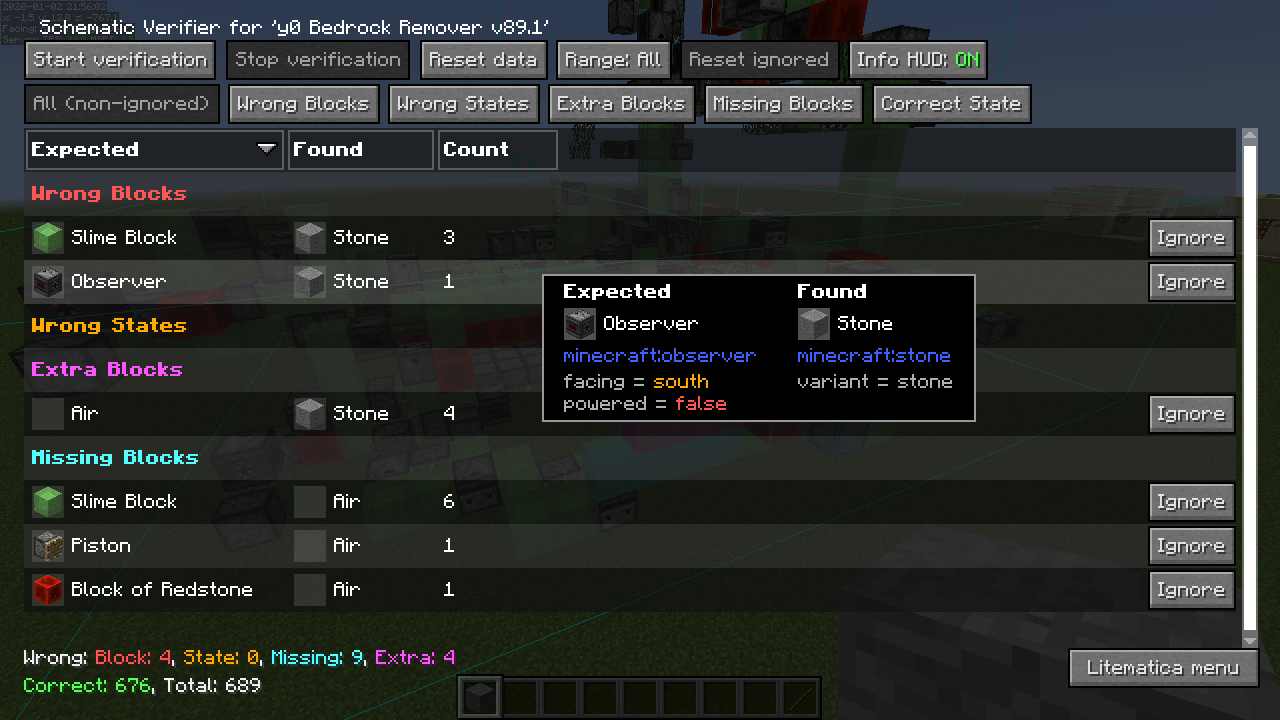
- Creative-Mode Helper Toolbox:
Unleash the power of creative mode with exclusive helper features. From Fill and Replace to Delete and Paste modes, Litematica empowers you to manipulate your world effortlessly. Paste your schematics directly into the world, seamlessly transitioning from blueprint to reality with immediate precision in single-player or through /setblock commands in multiplayer.
How to Install Litematica
Step-1 Download & Install Fabric
Litematica for Minecraft requires the Fabric Mod Loader in order to be installed. This is very simple to install. All you need to do is download them from the links below, run them with Java, and then click “Install” in the installer that opens up. It really is that simple and easy. The video above goes more in-depth with installing Fabric.
Download Fabric: https://fabricmc.net/use/
Step-2 Download Litematica
Now, Download Litematica from above as per your requirements.
Step-3 Install Litematica
To start installation process Just hit the Windows Key on your keyboard and ‘R’ at the exact same time. This will open up the ‘Run’ program. In the search box type, ‘%appdata%’. This will launch the ‘Roaming’ folder on your computer. At the very top of this folder, you will see a program called ‘.minecraft’. Open this folder, and in it, you should have a folder titled ‘mods’. If you don’t, just create one!
After you’ve found or created your ‘mods’ folder, installing Litematica is easy. Just take it and drag and drop them into this ‘mods’ folder. After you’ve done that, the mods are installed! We aren’t quite done yet though. We still need to make sure that we are selecting the right version of Minecraft.
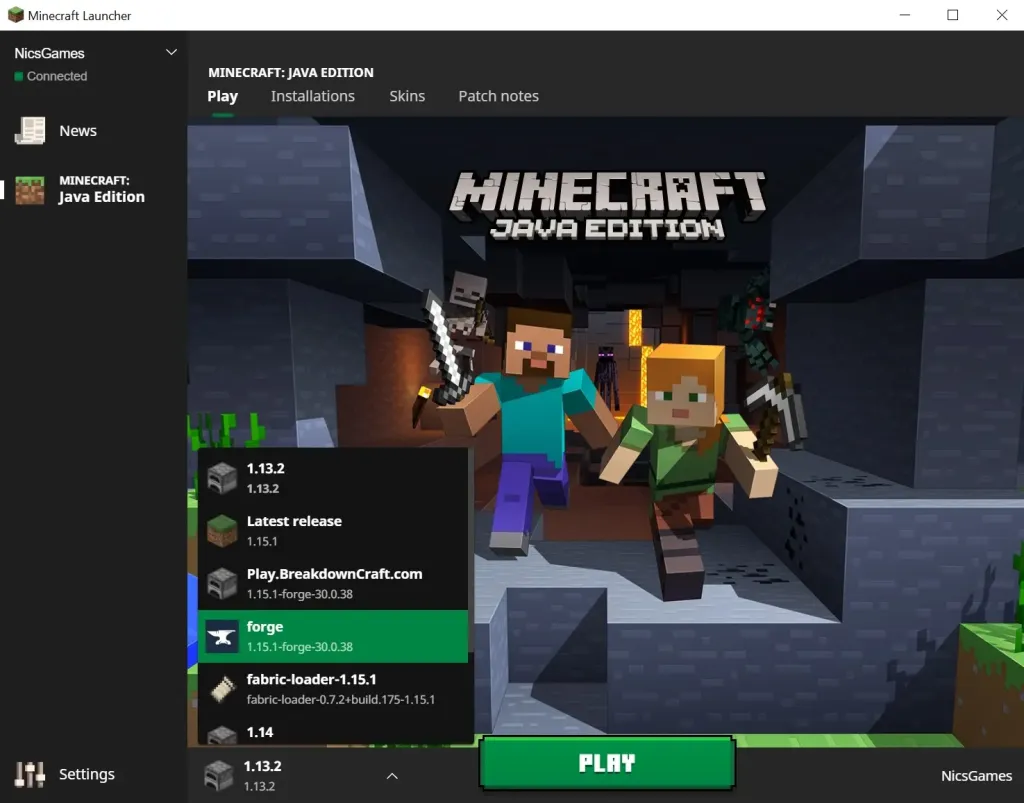
Step-4 Open The Minecraft Launcher & Select The ‘Fabric’ Profile
In order to select the correct version of Minecraft, we need to open up the regular Minecraft launcher that we allow know and love. From here, we can click the up arrow next to the ‘Play’ button. From there, find the profile titled ‘Fabric’. Then, click the big green ‘Play’ button. Minecraft should then launch with Voxel Minimap installed.
Step-5 Have Fun & Enjoy Litematica
Congratulations! Litematica is now installed! Have some fun, build stuff, or install some other mods. Now checkout the Getting started section in order to start using litematica.
Getting Started with Litematica
First of all, the Litematica main menu opens by default with M and the config GUI opens with M + C (unless you are for example on the AZERTY keyboard layout, then M will be , instead and M + C will become , + C). There is also a button to open the config GUI in the main menu.
If you have Optifine installed, then there are some options that you most likely will need to disable in Optifine, or otherwise it will break the schematic rendering:
- If you get glitchy weird triangles, then in 1.16+ first try updating to the latest Litematica version. If that doesn’t work, then set shaders to OFF (not Internal) and restart the game.
- Render Regions probably needs to be disabled to prevent weird rendering issues (the schematic (partially?) rendering in weird places)
- Fast Render might also need to be disabled if there are still some weird HUD/GUI rendering issues
To create a new schematic:
- First switch to the
Area Selectionmode, as it will make things easier/faster. - You can change the mode either with the bottom left button in the Litematica main menu, or using holding
Ctrland scrolling with the mouse wheel while you are holding the “tool item”, which by default is a stick (it can be changed on theGenericconfig GUI tab). - Now if you only need one box, you can switch to the
Simplearea selection mode in the Litematica menu (it’s by default onNormalmode). - If you need multiple boxes (sub-regions), then stay in the
Normalmode, and create a new selection in theArea Selection Browserand make sure it’s selected (hilighted in white). It’s selected automatically when you create it, so don’t click on it (once) or you will unselect it. - After you have the selection to work with, you can left and right click while holding the “tool” to select the first and second corners respectively. You can sneak while clicking to put the corner next to the block you point at, instead of inside it.
- You can middle click to select a corner or a sub-region box to work with in the Normal mode. You can
Alt + scrollto nudge around the currently selected corner or box. - Often it’s easier/faster to use the
Expandmode instead of theCornersmode. You can switch between them withCtrl + Mor on theGenericconfig tab. In theExpandmode you first right click to move and reset the selection to the clicked block, and then you left click a block at the edges of your build, to expand the selection box around all of those clicked positions. - In the
Normalmode you can create and rename as many sub-region boxes as you need in theArea EditorGUI (default hotkey to open that should benumpad multiply, or use the button in the main menu). - After your selection is done, you can use a hotkey to save it as a schematic, or use the button in the
Area EditorGUI.
To work with loaded schematics:
- To later on use the saved schematic, you go to the main menu ->
Load Schematics, keep theCreate Placementcheckmark enabled, select your schematic and clickLoad. - It’s helpful to switch to the
Schematic Placementtool mode when working with the loaded schematic, as you can then use the “tool” to move and position the placement, by clicking orAlt + scrolling. - To rotate or mirror it, you can go via the main menu ->
Schematic Placements->Configure, or use the hotkeynumpad minusto open that placement config GUI. - Once the placement is in the correct position, I recommend locking it on the placement config GUI so that you won’t accidentally move it anymore.
- So one thing to notice here is that you can load a schematic once, and create any number of placements of it (from the
Loaded Schematicsmenu ->Create placement). Thus the placement is basically the position, rotation etc. data for a given “visible schematic copy”. - To only render for example one layer at a time, you can change the rendering settings on the
Render Layersconfig tab. There are also hotkey to cycle the mode, move the layer to the player’s position, and nudge the layer. By default the cycle keys areM + Page Up/Down, to move the layer isM + Homeand to nudge the layer isPage Up/Down.
Other things:
- All hotkeys can be changed, or the default keys seen, on the
Hotkeystab in the config menu. - If you need to change some blocks in a schematic, you can use the
Schematic Rebuildmode. Basically the Rebuild mode allows you to break, add, and replace blocks. Without any modifier keys held, you can punch out/break blocks in the schematic, and if you right click on a schematic block with a block in hand, you will place that block there just like it was actual blocks. - And then you have a few “modifier keys”, which allow you to break or place or replace blocks in continuous lines, or all identical blocks at once. Currently you basically have two variants of those modifier hotkeys: the “direction” variant gives you a Tweakeroo-like 5-way overlay which indicates in which direction you want to break or place or replace blocks in a straight continuous line. And then the “all” variant of modifier keys allows you to break or replace all identical blocks in the schematic. That can however be limited using the Render Layers and also by selecting a sub-region instead of having the entire placement selected.
- So to replace all blocks of a given type with another block, you would set a key for the
schematicRebuildReplaceAllhotkey, then hold that down while right clicking with the new block on the block to replace.